Video-based walkthrough
Museum Walkthrough: Mural Code and Elias
Follow the museum room keys to the camera logs, then compare the muddy footprints with the worker's account. Use your mural's displayed date if it differs from the archived run.
Quick answer
Use the crowbar for the Antique Room Key, search the plant for the Artwork Room Key, and enter mural year 1550 in the reviewed run. Retrieve the construction USB, unlock the janitor room and review Elias the Glazer before voting.
Follow the item chain
Use the steps in order, or jump to the last door you opened.
1. Use the crowbar and search the plant
Use the crowbar and collect the plant key.
- Success check
- Both antique and artwork rooms become accessible.
- If it remains unclear
- Inspect the fragile clue and search the plant inside the antique room.
Read the supporting evidence
§1. Use the crowbar and search the plant#
At the start, inspect the marked surface with the magnifying glass. The clue says it is fragile and needs a crowbar. Take the Crowbar from the end of the hallway and use it to remove the wooden plank.
Collect the Antique Room Key behind the plank. Unlock the antique room, search the plant and take the Artwork Room Key. Use that key to enter the artwork room.
2. Read the mural date and enter 1550
Enter the mural year and search the paper stack.
- Success check
- You obtain the Construction Room Key.
- If it remains unclear
- Use the exact date on your mural plaque if the historical example differs.
Read the supporting evidence
§2. Read the mural date and enter 1550#
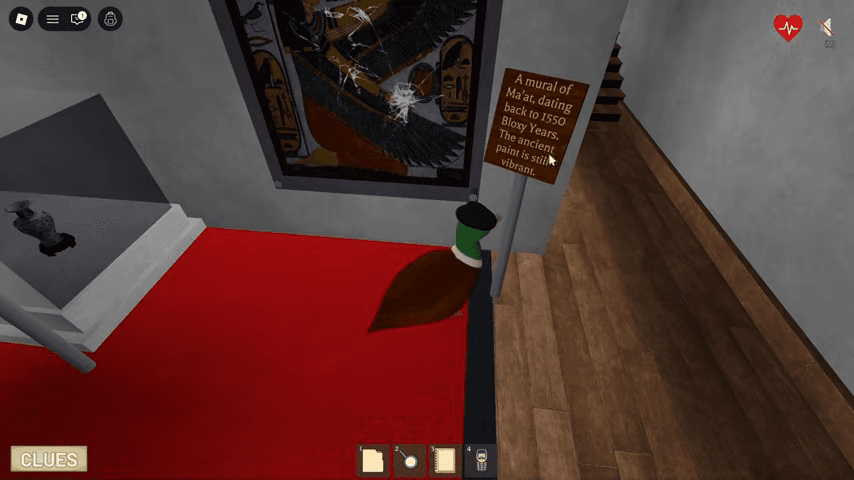
Inspect the mural's plaque in the artwork room. The reviewed frame states that it dates back to 1550 Bloxy Years. The magnifying-glass clue beside the later door asks for the year of the mural.
Enter 1550 at that keypad. This opens the security area. Other historical Museum footage shows a different ancient-art clue, so read the plaque and door hint in your own run if 1550 is rejected. Do not substitute another date without checking its matching clue.
Search through the stack of papers in the security area. At the end, collect the Construction Room Key.
3. Bring the construction USB to the reader
Take the USB and insert it in the raised reader.
- Success check
- The camera connection begins processing.
- If it remains unclear
- Press the red button before placing the USB.
Read the supporting evidence
§3. Bring the construction USB to the reader#
Use the Construction Room Key at the construction room door and take the highlighted USB inside. Return to the computer in the security room.
Press the red button to bring out the reader, then place the USB in it. Let the connection process finish so the camera logs become accessible. Take the Lockpick in the security area while you wait.
4. Open the janitor room and read its notes
Lockpick the janitor room and read the book.
- Success check
- You have the worker behavior clue and available camera logs.
- If it remains unclear
- Complete all three lockpick rounds and allow the PC to finish.
Read the supporting evidence
§4. Open the janitor room and read its notes#
Use the Lockpick on the janitor room door. Complete three successful lockpick rounds; the last round moves faster in the recorded run.
Read the book inside. The creator connects its comments about the worker's unusual behavior and questions to the later suspect comparison. Return to the security computer and open each camera log after the USB has finished processing.
5. Compare footprints and the camera timeline
Compare footprints and inspect all camera logs.
- Success check
- You can connect the worker to the relevant areas.
- If it remains unclear
- Use the magnifying glass for the floor marks.
Read the supporting evidence
§5. Compare footprints and the camera timeline#
Equip the magnifying glass in the construction room and inspect the muddy marks. Then examine the footprints near the missing crown display. The creator uses the matching dirt and the worker's muddy boots as a link between those locations.
Inspect the camera images labeled 02:50 PM, 03:39 PM and 05:00 AM. The walkthrough points to the construction-room activity in the earlier image, a person by reception in the later afternoon image and the crown missing by the morning image. Read the logs yourself rather than accusing from a single muddy mark.
6. Review Elias the Glazer and vote
Review Elias the Glazer and complete the accusation.
- Success check
- The recorded run selects that suspect.
- If it remains unclear
- Verify the role and current case statements before voting.
Read the supporting evidence
§6. Review Elias the Glazer and vote#
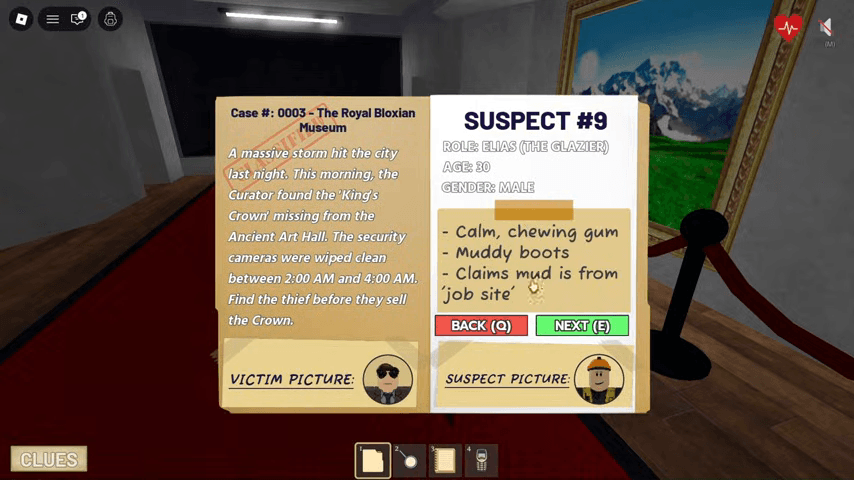
The gameplay narration identifies Elias the Glazer as the suspect whose work location, muddy boots and behavior connect to the reviewed evidence. Automated captions call the role glacier, so use the Glazer role shown by the suspect record.
Check the remaining case information, end the investigation and select Elias the Glazer in the interrogation room. This guide reports the creator's selection and the visible suspect screen; it does not claim a replay in the October 9 build.
Scope and sources
These steps follow archived English gameplay. The official experience was updated on October 9, 2026; this route has not been replayed in that build. Compare the clues in your own round if a code or layout differs.
- These steps follow archived English gameplay. The official experience was updated on October 9, 2026; this route has not been replayed in that build. Compare the clues in your own round if a code or layout differs.