Video-based walkthrough
Train Walkthrough: SNOWMAN and the Mechanic
The Train sends you between compartments as each clue unlocks a tool. Keep track of where the SD card was found and compare the dusty tools with the mark by the broken lock.
Quick answer
Use the red coat key, scissors and missing handle to leave the first compartment. Solve SNOWMAN and 46, then use 4940 at the first-room safe. Follow the acid and SD-card route and vote for the Mechanic after checking the matching dirt marks.
Follow the item chain
Use the steps in order, or jump to the last door you opened.
1. Repair the first compartment door
Collect scissors, compartment key and door handle.
- Success check
- The first compartment door opens.
- If it remains unclear
- Check the red coat, teddy bear and blue luggage.
Read the supporting evidence
§1. Repair the first compartment door#
Click the red coat to obtain the Luggage Key and use it to collect the Scissors. Cut the teddy bear with the Scissors to reveal the Compartment Key.
The door also needs a handle. Search the blue luggage for it, fit the handle to the door and use the Compartment Key. Both the handle and key are needed to leave.
2. Decode the magic word SNOWMAN
Decode letters and enter SNOWMAN at the wand.
- Success check
- The briefcase opens.
- If it remains unclear
- Use UV for numbers and the magnifier for window letters.
Read the supporting evidence
§2. Decode the magic word SNOWMAN#
In the next compartment, equip UV light to reveal the numbered clue and its instruction to connect numbers with letters. Use the magnifying glass on the windows to find the number-to-letter mapping.
The creator resolves the mapping to SNOWMAN. Interact with the magic wand and enter SNOWMAN to open the briefcase. The narration corrects itself several times while reading the digits, so the completed word is the reliable reference; use your windows to verify the mapping.
3. Solve the shapes for 46 and free the key
Enter 46 and cut the key wires.
- Success check
- You can collect the key and leave.
- If it remains unclear
- A visible key remains blocked until its wires are cut.
Read the supporting evidence
§3. Solve the shapes for 46 and free the key#
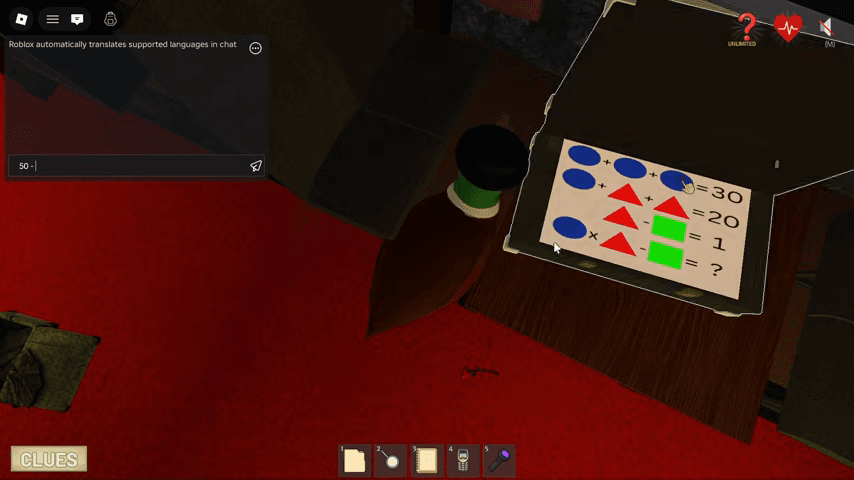
The briefcase shows three blue circles adding to 30, so a blue circle is 10. A blue circle plus two red triangles makes 20, so a triangle is 5. A triangle minus the green square is 1, so the green square is 4.
The final expression is blue circle multiplied by red triangle, minus green square: 10 × 5 − 4 = 46. Enter 46 at the lock.
Take the cutters in this area and cut the wires holding the key before trying to collect it. Use the freed key to continue to the next compartment.
4. Read 4940 and return to the first-room safe
Enter 4940 in the first-room safe and open side rooms.
- Success check
- You have a lighter and potion.
- If it remains unclear
- Return to the first room, then match the safe keys to doors.
Read the supporting evidence
§4. Read 4940 and return to the first-room safe#
Use the magnifying glass on the wall clue in the later compartment. It reveals 4940 in the recorded run. Return to the safe in the first room and enter the code.
Collect the lockpick and the two keys from the safe. Return to the locked side rooms, use each key at its matching door, and use the lockpick for the remaining room. Collect the lighter and the potion from the newly opened areas.
5. Make acid and search Room B3
Heat the potion and apply the resulting acid.
- Success check
- The route to the SD Card in B3 opens.
- If it remains unclear
- Wait for both processing and lock-opening animations.
Read the supporting evidence
§5. Make acid and search Room B3#
Use the potion in the jar, then ignite the setup with the lighter. Wait for the process to finish and collect the acid. Apply it to the locked route and wait for the lock to open.
In the newly accessible compartment, take the SD Card from Room B3. Keep the room label in mind because it connects the card and tools to the later investigation.
6. Read the SD card and copy the photo code
Insert the SD card and copy the photo code.
- Success check
- The final book becomes accessible.
- If it remains unclear
- Read the displayed symbols rather than the auto-captioned code.
Read the supporting evidence
§6. Read the SD card and copy the photo code#
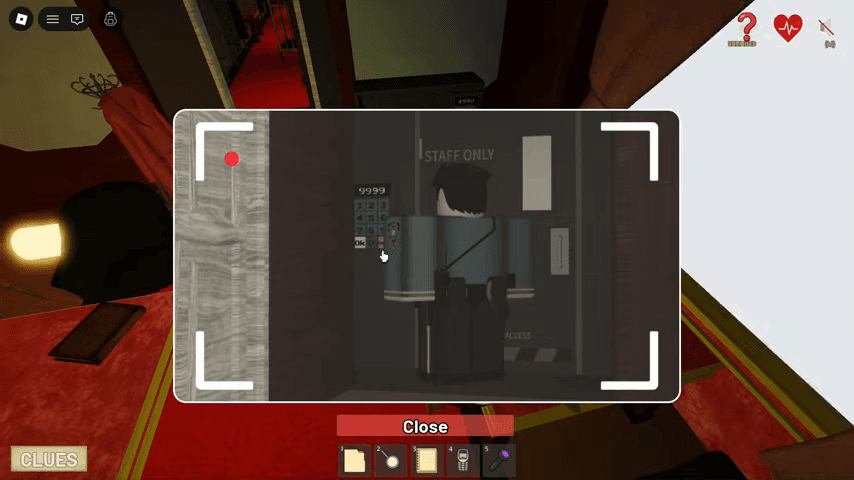
Return to the camera in the first compartment and insert the SD Card. Inspect the displayed image and copy its code exactly, including any symbols. Return to the matching panel and enter what the photo shows, then read the unlocked book.
The displayed photo shows 9999 at the staff keypad. The creator says four nines, which the automatic captions render ambiguously as 4 * 9. Enter 9999 at the matching panel in the recorded route, then read the book. If your photo differs, copy its visible digits.
7. Match the dirty tools and choose the Mechanic
Compare dirt marks and vote the Mechanic.
- Success check
- The walkthrough completes its accusation sequence.
- If it remains unclear
- Inspect both the broken lock and B3 tools with the magnifier.
Read the supporting evidence
§7. Match the dirty tools and choose the Mechanic#
Inspect the broken lock with the magnifying glass to reveal its dirt mark. Return to the tools in Room B3 and use the magnifying glass to compare the matching mark.
The creator connects the dusty toolbox and SD card location to the Mechanic's information. He initially corrects his spoken room label, then uses Room B3 for this comparison. Complete the case information, end the investigation and vote for the Mechanic as shown in the run.
Questions and answers
What is the Train magic word?
SNOWMAN. It comes from the UV numbers and magnifying-glass letter mapping on the windows.
What is the Train math answer?
46: blue circle 10, red triangle 5 and green square 4, giving 10 × 5 − 4.
Where do I use 4940?
At the safe in the first compartment. It provides the lockpick and keys needed for later rooms.
Scope and sources
These steps follow archived English gameplay. The official experience was updated on October 9, 2026; this route has not been replayed in that build. Compare the clues in your own round if a code or layout differs.
- These steps follow archived English gameplay. The official experience was updated on October 9, 2026; this route has not been replayed in that build. Compare the clues in your own round if a code or layout differs.